Vietspices Search

Tuesday, January 24, 2012

Mứt Dừa (Candied Coconut Ribbons)


RECIPE: Mứt Dừa 
1. Lấy toàn thể 12 tháng trong năm đem rửa sạch mùi cay đắng, ghen tị, thù oán…rồi để cho ráo nước
2. Tuần tự cắt mỗi tháng ra 28, 30, hay 31 phần.
3. Trộn đều với : – Một chút tin yêu – Một chút kiên nhẫn – Một chút can đảm – Một chút cố gắng – Một chút hy vọng – Một chút trung thành
4. Ướp thêm gia vị: lạc quan, tự tin và hài hước
5. Rồi đem ngâm một lát trong dung dịch “Những điều tâm niệm của mình”.
6. Vớt ra, xây nhỏ, đổ tất cả vào “Nồi yêu thương” và nấu với lửa “Vui mừng”.
7. Đem ra ăn với “Nụ cười” trong chén “Bao dung”.


Oops...sorry! that wasn't the Mứt Dừa recipe but it's sure is a wonderful recipe isn't it? There is a few more recipes that I wanted to make for the Year of the Dragon but time is running out. Looks like Mứt Dừa will be the last post until next year. 

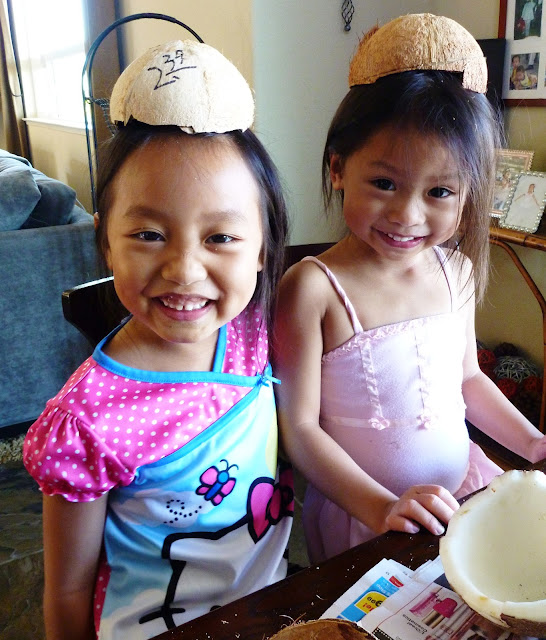
Mứt Dừa wasn't on my Tet list until I saw coconuts at Bel Air. The other day, while we were at an Asian market, my younger daughter saw Mứt Dừa and wanted me to buy it for her. It seemed like all the Mứt are made in Vietnam. I hesitated to buy it as I've heard horrible stories about what goes in them. I promised that I will make Mứt Dừa for her instead.  Today, my girls and I had so much fun prepping for Mứt Dừa. They were fascinated with the whole process of extracting the pulp from the coconut. First, the juice had to be drained by poking the eyes on the coconut. Next the shell was cracked and the coconut meat was pried from the shell. They had a blast being silly by wearing those shells on the heads.


We made four different colors using the beet extract for pink, turmeric powder for yellow, pandan extract for green and the coconut in its natural form for white. My favorite are the beautiful green and white coconut ribbons. The yellow coconut is just a little too yellow and pink is not as saturated as I had hoped. But my girls couldn't stop munching on these nutty, buttery, rich coconut ribbons coated with sugar. 
*
RECIPE: Mứt Dừa 

*
Ingredients


2 coconuts
2 cups sugar
1 bag vanilla sugar
1 tablespoon salt, for soaking the coconut ribbons
1 teaspoon beet juice, for red color, optional
(click here for natural beet coloring recipe)
1/2 teaspoon turmeric powder, for yellow color, optional
1/3 teaspoon pandan extract, for green color, optional 
*
Preparing Coconut


Position a rack in the middle of the oven and preheat to 400 degrees.
Using an oyster knife or a screw driver pierce holes in 2 of the three eyes and pour out the juice. 


You can use the coconut juice to make Thịt Trứng Kho Tàu or just drink it if it's sweet. Use a meat tenderizer or a hammer to crack the coconut open. 


Put the coconut on baking sheet and bake 15 minutes. The heat will loosen the meat from the shell. 


Remove coconut from oven. Holding it with a dish towel, use a small knife or an oyster knife to pry out the meat. Try to keep the pieces as large as possible.


Using a vegetable peeler, shave off the brown skin from the white coconut meat. Rinse the meat to remove any excess bits of brown skin. use a slicer or a sharp knife, slice or cut the meat into thin ribbons of at least 2 inches long. Keep coconut ribbons in salt and water bowl. 


Rinse and drain coconut ribbons and set aside.

*
Mixing Coconut Ribbons


In a large bowl, combine coconut ribbons and the remaining ingredients and mix well.


Let it sit until sugar dissolved. If you want to make coconut ribbons in 4 different colors, divide the mixed coconut in a four separate bowls and mix the colors to your liking.

*
Simmering Coconut Ribbons


In a large pan, add ribbons and bring heat to high. When the sugar starts bubbling, reduce heat to low and simmer for about 30 minutes. Make sure to stir constantly to expose the ribbons evenly to the syrup. They will gradually become silvery and soften.


The ribbons will soon turn white, become dry looking and stiffen. Keep stirring. The sugar will first cling to the ribbons and then flake off in white, sandy bits. When the ribbons are covered by a dry, sandy sugar film, they are done.


Remove from the stove and let the coconut ribbons cool completely. Transfer them to an airtight container and discard the powdery sugar.
*
Presentation


Enjoy candied coconut ribbons with a cup of hot tea!

Sunday, January 22, 2012

Thịt Giò Bó (Red Pork Roll)


It's almost the end of The Year of the Rabbit and I have been making ông Táo (the God of the kitchen) work so hard before he gets sent back to the heaven to report to the King of Heaven about all that has happened in my kitchen. This is according to the Chinese folklore.

I hope I scored well.

Thịt Giò Bó (Red Pork Roll) is my last savory dish for Tet The Year of Dragon. For the last week, I have made pate gan (chicken liver pate), cha lua (Vietnamese ham) and now Thịt Giò Bó to complete the main fillings for banh mi thit (Vietnamese sandwiches). Supposedly, Thịt Giò Heo Bó made of pork front hock has a thick layer of fat which makes it very rich and fatty but tasty . . . just how I like it.  But since my new year's resolution is to be fit and eating a well-balanced and healthy diet, I used pork belly which contains a lot less fat than pork front hock.  

Thịt Giò Bó recipe is similar to Thịt Xá Xíu (Cha Siu). Instead of making it from scratch, you can get a bag of Cha Siu seasoning which contains the primary ingredients and red food coloring that turn the exterior layer of the meat dark red.  Lately, I have read about the dangers of artificial food coloring and the dangerous food and products imported from China, I try to limit or avoid buying food or supplies that are made from China. Instead I used beet to make  my own natural red food coloring for this Thịt Giò Bó as its skin has to be red.  If you got nothing else out of this recipe, it would still be quite a fun experiment on making natural food coloring. 
*
RECIPE:  Thịt Giò Bó

*
Ingredients

a piece of Pork Belly or Pork Butt, washed, dry pat
1 1/2 teaspoon Sugar
1 1/2 teaspoon Salt
1/2 teaspoon fresh ground Pepper
1 teaspoon Five Spices
1/2 teaspoon Peppercorns
4 tablespoons minced Shallot (2 whole shallots)
Twine, to tie meat
2 large Beets, peeled and chopped each into 16 pieces
(make about 2 cups red beet coloring)
*
Making Red Food Coloring


In a pot, bring beets with just enough water to fully cover them to a boil.  Reduce the heat and simmer for about an hour or until beets are soft.  Add more water during simmering as needed.  Strain the beet liquid and preserve about 2 cups of liquid.  Set aside.   Make sure to use gloves when handling beets as it will stain your hands and it's hard to clean off.   I also covered my cutting board so it wont get stained.   
*
Marinating Meat


Combine all the ingredients. Rub the pork belly with the marinade mixture.


Roll it up and tie it tight with twine. Marinate for at least an hour in the refrigerator.


*
Cooking Meat


Place meat in a pot and pour 1 1/2 cups of red beet color over the meat.  Bring it to a boil.  Reduce the heat and simmer with cover on for about 30 minutes.  During the simmering process, turn the meat and coat it with red color occasionally.  

*
Presentation


Thịt Giò Bó can be enjoyed with banh mi (Vietnamese baguette sandwich) with or without pate, and cha lua (Vietnamese ham).  Remove the twine.  Thinly slice the meat and insert it in the baguette sandwich.  Garnish it with pickled carrot and daikon, julienned cucumber, a few sprigs of cilantro, sprinkle some fresh ground pepper and a dash of good soy sauce.  


Chúc ông bà 1 tô như ý. 
Chúc cô chú 1 chén an khang. 
Chúc anh chị 1 dĩa, 1 dĩa...tài lộc!


Here's to the Year of the Dragon . . .

Saturday, January 21, 2012

Chả Lụa (Vietnamese Ham aka Vietnamese Pork Roll)


There is something special about Tết that every year around this time, I tend to work a lot harder just to maintain the house and keep it nice,  fresh, and presentable.   A day after the Solar New Year, I swapped things out to welcome in the new season. I spruced up my front hall with pots of hoa cúc vàng (chrysanthemum flower) and a vase of hoa anh đào (cherry blossom). The red envelops are hanging happily on the lucky tree.


My day is usually packed full of my two girls’ activities and chores around the house. But I always try to squeeze my cooking in between.  Therefore, I usually get my cooking done by the time the sun sets. So today after being my girls' chauffeur, I managed to get a new recipe Chả Lụa (Vietnamese Ham aka Pork Roll) done so I can post it in time for the new year. 

If you hear someone mentions about Giò Lụa, it is another name for Chả Lụa. The term Giò Lụa is part of the northern Vietnamese's dialect while Chả Lụa originates from southern Vietnamese dialect.

My experiment on Chả Lụa turned out beyond my expectation. I usually don't enjoy Chả Lụa as much but if I do eat Chả Lụa , I like it with lots of peppercorns and packed with flavors. So now that I make my own, I wanted my Chả Lụa to taste exactly as I would have imagined it, wrapped in the fragrance of banana leaves and accented by the spiciness of peppercorns.  I must admit there was one problem - it lack adequate banana leaves to contain and shape the Chả Lụa, leaving the center exposed after steaming.

However as soon as the Chả Lụa was off the steamer, my husband and kids devoured all the small Chả Lụa rolls. Hearing their enjoyment and compliments sure made my day.
*
RECIPE: Chả Lụa
*
Ingredients


2 pounds Ground Pork (bought mine at Walmart Superstore)
2 tablespoons good Fish Sauce (prefer 3 crabs brand)
2 tablespoons Sugar
1/2 teaspoon Salt
1 teaspoon fresh Ground Pepper
1 Shallot, minced
2 cloves Garlic, minced
1/4 cup ice water 
2 tablespoons Tapioca Flour (Bột Năng) 
1 bag Alsa Baking Powder or any single action Baking Powder brand (2 teaspoons)
1 teaspoon Peppercorns
Banana Leaves (available at any Asian markets in the frozen section), rinsed and pat dried
Twine, to tie chả roll (plastic twine would work best)
*
Preparing Pork Paste

do not add peppercorns at this step.  I made a mistake

Mix pork, fish sauce, sugar, salt, pepper, shallot and garlic in a mixing bowl.

In a separate bowl, add ice water, tapioca flour and mix it well. Then add baking powder and mix.  Baking powder causes a rapid expansion of the liquid and has a tendency to foam over.  


Pour the water mixture into the pork bowl and mix it well. Cover and place it in the freezer for about 3 hours until the pork paste is really cold or frosty but not yet frozen. You can also place it in the frigde overnight instead freezer. This process will help the meat to bind together.


Remove from freezer or fridge then place it in the food processor with half of the pork at a time; do not overload the work bowl. Process to a completely smooth paste. Stop occasionally to scrape down the sides of the work bowl. Transfer the pork paste to another bowl.  Add peppercorns and mix well.  Place it back in the fridge until you're ready to wrap it up.

*
Wrapping Pork Paste

It was hard to tie with this type of twine.  Using plastic twine would be easier.


Wrap pork paste in at least 3 layers banana leaves. Make sure to keep your hands moist with cooking oil and also brush oil on the leave to prevent pork paste from sticking.

Tightly wraps into a cylindrical shape then fold the two ends in.  Use the twine to tie it tightly.

fold into a cylindrical shape

fold in the four sides of the two ends

trim the top if it's too long then fold in

tie it up with twine

mini Chả Lụa rolls

2 lbs of pork produces 2 big rolls and 4 mini rolls

Steam for about 20-25 minutes.

*
Presentation


Chả Lụa tastes wonderfully when pan fry over high heat until the skin is golden brown. 

Enjoy Chả Lụa as appetizer or served along with nem chua (fermented beef), banh chung (square sticky rice cake), banh tet (cylindrical sticky rice cake). 


Chả Lụa is a versatile recipe, therefore, it served well with anything from banh mi (Vietnamese Baguette), banh day (sticky rice cake), banh cuon (Steamed rice rolls), and variety of noodle dishes such as bun bo hue, bun thang.

*
Chúc mọi nhà luôn ấm no !